Go to (Nordiina.com) > Click on Sell On Nordiina top left of page header > On sell on Nordiina page click on any of Collab Now / Open a Shop / Start Selling on Nordiina button > Fill in the registration form as follows:
After completing register form click to submit form and wait for account approval. Admin will review your account and approve it. You will get email notification as soon as account approved after that you can login into your seller account and setup store.
Whenever a Brand first time logins to their store they will have a “Store Setup” widget. This will give them the option to setup store essential setting from the very beginning.
If any Vendor skipped widget setup or wants to change any store setting in the future, then he or she can do this easily from the dashboard as well.
Just have to go Seller Account Dashboard (Store Manager) > Settings..
Login to account > My account is on the top right-hand corner of the page header.
Here you will find purchased history, shops you follow, inquiries about products, etc…
Have more questions? Submit a request
Go to Store Manager> Settings>Store Policies.
This information is available to customers with vendor product in order details and store invoice.
Vendor may setup their store policies from here –
Policies are visible at store page, vendor’s single product page, order details and store invoice.
Have more questions? Submit a request
Go to Seller Dashboard>Orders
To view orders that have been placed, go to Orders in NORDIINA Dashboard left menu. At the top of this screen, you can view the standard filter and search area. A list of orders appears in order of date made:
Have more questions? Submit a request
Shop Manager > Settings > Store Tab > Add Shop Name
Shop Manager > Settings > Store Tab > Add Shop Description
Shop Manager > Settings > Click on store Tab > Add store Logo
Note: The shop logo should be square in ideal dimension size of shop logo is 125X125 pixel.
Shop Manager > Settings > Store Tab > Store Banner
We recommend the following dimensions:
Shop Manager > Settings > Vacation Mode Tab > Enable / Disable Vacation mode, Disable purchase during vacation etc, Vacation Type, Vacation Message etc.
Note: When Vacation mode is on customers cannot purchase from your shop as long as you disable checkout.
Have more questions? Submit a request
On Nordiina you can set your store Privacy Policy, Terms and conditions, Shipping policy and Return policy.
These policies display on all of your products under the policy tab.
Privacy Policy - best practice is to state you will only use a customer’s details for order discussions and their data will not be used in any other way.
Terms and Conditions - best practice is to include what your terms and conditions are for your products.
Shipping Policy - best practice is to include how you ship the products and how long deliveries will take for orders.
Return Policy - best practice is to include whether you accept returns or not.
Adding Product
Go to Seller Dashboard>Products
At the far right of each product are actions you can perform on the row:
You also have some useful options at top right of the screen:
Edit product stock quantity and prices:
To edit product stock quantity and prices after publishing product. Please follow steps:
a) Login into your seller account.
b) Go to products and click on checkbox which you want to make update stock quantity, prices etc https://prnt.sc/1qznbro
c) Scroll bit up your mouse and click on bulk edit button.
d) Make update in pop up form opened as per your requirement for stock quantity and other input if any and save it. https://prnt.sc/1qzn4np
"* Please note: There is restriction on product description, attribute, variation images and cannot be editted once products are published. Please send us an email to seller@nordiina.com to make those changes. *"
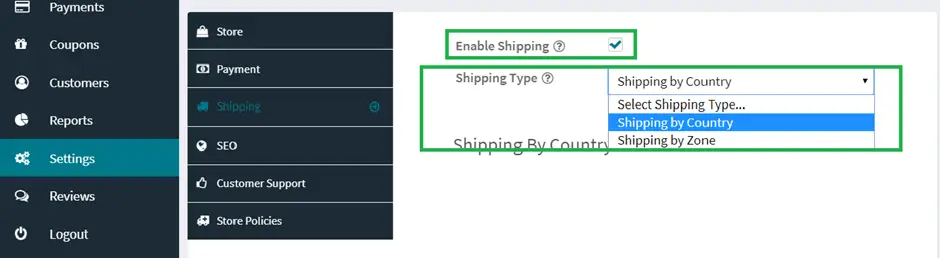
All shops must set their shipping for their full shop via:
Shop Manager > Settings > Shipping
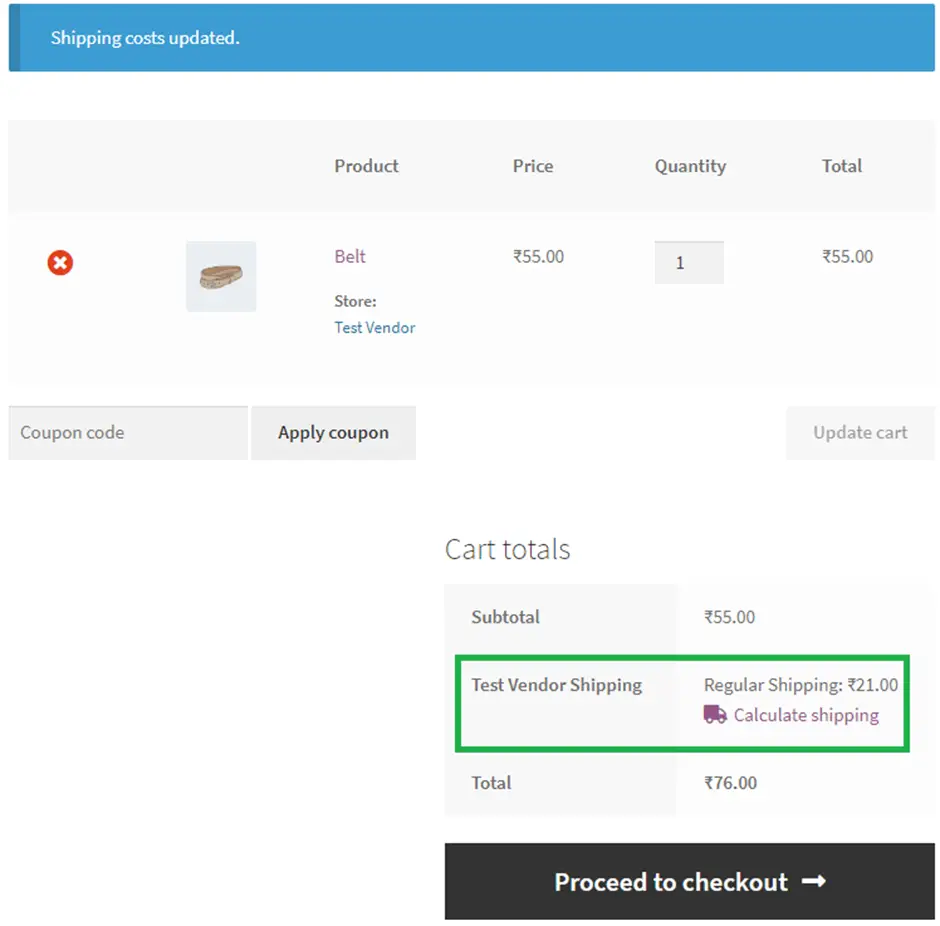
You simply add the charges for International shipping and then add the fee you wish to charge for shipping.
Here you can also set maximum shipping costs to ensure that the shipping cost is not charged on each product purchased.
This will set the shipping costs for your shop overall.
If your products have different shipping costs you can add shipping on the edit/add product form.
Please note: Shop shipping must be set for customers to be able to buy your products, simply having it at product level will not work.
Have more questions? Submit a request
Each Vendor can mark their every item for an order as Shipped.
Go to Dashboard > Orders > Choose the order from the list
Vendors can:
Simply set a maximum shipping amount to "Maximum shipping charged per order for national shipping/international shipping".
Please note: Ticking "Charge once per product for national shipping, even if more than one is purchased" will mean that if a customer buys the same product but buys 3 of that product the shipping is only charged once. But if they buy 3 of your different products they will be charged 3 x the shipping costs unless the "Maximum shipping charged per order for national shipping/international shipping" is set to a value.
Have more questions? Submit a request
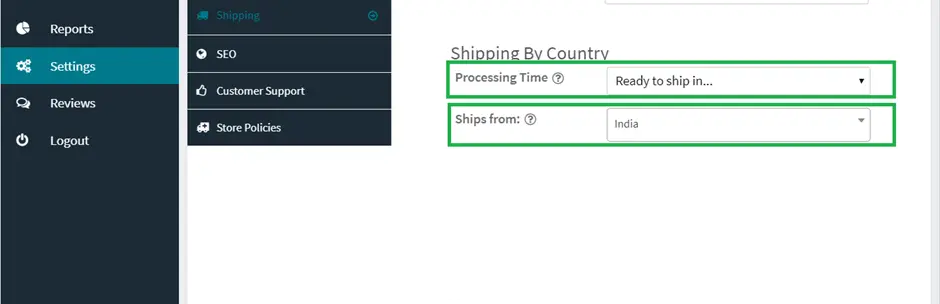
To set up shipping cost for different country. Login to your seller account and go to Setting > Shipping:
You can add as many country as you want where you allow shipping by clicking + button.
Have more questions? Submit a request
This is not a feature we provide currently but you can set maximum shipping costs to prevent large shipping fees being applied to your sales.
Have more questions? Submit a request
Shop Manager > Settings > Shipping
Here you will want to include your dispatch times and type shipping, i.e. tracked or 1st class etc.
Refund process here-Nordiina platform:
There is no way to refund overcharged shipping as shipping will charge only based on customer country defined shipping charge. However if there is some rarest cases then customer have to raise refund on order and then order will cancel and order refund will credited to customer account.
If you find the price box has not appeared or the price is not showing on your product listing, then pleas ensure you have the product type set to "simple product".
If your product is a "Variable Product" then you will need follow our how to add variations guidance to set up variations properly.
Have more questions? Submit a request
Shop Manager > Products > Add Product
Currently you cannot download a CSV file from Nordiina.
Have more questions? Submit a request
This provides the customer with more detail about the item, such as size, materials used, weight, colour, personalization etc.
Have more questions? Submit a request
It is not possible to import products from another platform. However, you can import csv file, first you have to download required format which will be accepted then format for csv file in required format then you can import.
It's important for you to list products manually as all platforms have different search processes and set ups.
You will also learn how to list products within our system and set up products properly to sell via Nordiina. “Simple Product” and “Variable product”
Have more questions? Submit a request
We recommend ensuring all your product photos are of the same dimension for your shop to keep it consistent and visually attractive and image should be good quality and if possible use transparent image. The Ideal product size should 600 x 600 pixels.
The “Featured Image” is the main image that customers will see on the site within the category listings.
Please ensure you have a “Featured Image” on your item or otherwise you will have a blank item showing in the marketplace.
Each listing can have up to 6 images within the gallery.
The “Regular Price” is the normal price for your product. The “Sale Price” is a price for if you are discounting from your “Regular Price”.
A product type is simply the type of product you are listing.
A simple product is the most common type of product is just a product without any options for variations such as colors or sizes.
A variable product is a product that requires a dropdown to be added for customers to choose between colors, sizes or different options for example.
Have more questions? Submit a request
Adding variations “Variable product” to your products is a great way to save time when it comes to adding your items.
Many items come in different colours and sizes and having the ability to add one item with multiple options will save time over adding each item individually.
Step One: Change Product Type from Simple Product to Variable Product
Step Two: Go to the Attributes Tab > Select an Attribute > Tick used for Variations > Enter your Variations into the box
The dropdown will show pre-populated by other users choices, if one appears to not exist simply click "Add New".
Do not be put off by the case sensitivity of how other users have typed it in as customer will see it all in lower case in order for it to be visually presentable to them.
*Our system can handle up to 30 variations combinations being added at a time.
*A simple example of variation combinations are 1 dropdown with 30 options (30 x 1 = 30) or 2 dropdown options one with 10 options and another with 2 options (2 x 15 = 30). It's the sum of each possible combination.
Step Three: Go to the Variations Tab > Select “Create Variations from all Attributes"
Step Four: Click Expand > Enter the price for each variation combination, SKU (if any), stock quantity, weight etc.
*Tip: If all the variations have the same prices then you can go to go to the drop-down and select “Set Regular Prices.
Step Five:
Add Product
It will also improve the customer experience and make it a smoother for your customers shopping your items.
The following tutorial video shows the basic steps to add variations to your items.
This allows for any types of variations to be added.
Step 1 : Click on the edit icon at the actions as shown in video
Step 2 : In edit Product page scroll down to go to the variation tab.In this tab you can set default value or other values
Step 3 : then click on the down icon on the right side to open the manage stock settings. Then click on the manage stock to change the stock quantity/price and other options
Step 4 : You can add more variation by click on the plus icon at the end of last variation and repeat the step 3.
Step 5: After all scroll down to end to submit the settings.
Step 6 : After Save you can preview your product by click on preview button.
Have more questions? Submit a request
Please ensure that you have the Product Type set properly.
If it is a simple product i.e. a product without any variations such as different colors etc then it should be set to “Simple Product” and the price box will appear.
If it is a variable product i.e. a product with variations such as different colors etc then it should be set to “Variable Product” and you should follow our variations guidance.
Another issue for this is managing your stock and not entering a stock level.
Have more questions? Submit a request
Please ensure you have set the inventory to 1 in stock or the number of products you have in stock so they go out of stock once sold out.
Have more questions? Submit a request
If you have a product that is made to order, then ensure you do not "manage inventory" and the product will stay in stock indefinitely i.e. will not go out of stock when it sells.
Good practice is to state in the title and description that it is made to order to inform the customer.
Have more questions? Submit a request
Please ensure you have set the inventory to the number of products you have of each in stock.
Have more questions? Submit a request
Shop Manager > Products
Here you will be able to edit or delete your products.
Have more questions? Submit a request
You can publish a product that is saved a draft by simply editing the product via your Shop Manager > Products and clicking "Save Changes".
Have more questions? Submit a request
Shop Manager > Products
Here you will be able to duplicate a product.
Please note: Ensure you have removed the or edited the title of your product as when you duplicate a product the phrase (copy) is added to the title and unique web address of the product.
Have more questions? Submit a request
Once a product has been added the link will remain the same.
There is currently not a way to edit links on Nordiina.
Have more questions? Submit a request
You currently cannot add sections or move products around within your Nordiina shop.
The categories you place your products in populates a dropdown menu on your shop page for customers to filter products by category on your shop.
Have more questions? Submit a request
Yes, you can add SKU under inventory tab for your product
There is a notes box at checkout for personalization messages.
If the customer forgets to fill this in you will have full access to their email to communicate with them with regards to the exact requirements.
You can check your orders by going to Shop Manager > Orders.
Always ensure you have the correct date range on your dashboard so it includes today's date.
All orders are emailed to your registered email to notify you.
They also appear on the Order screen under Shop Manager > Orders.
Please note: Always check your junk/spam folders for emails. Sometimes they can be filtered to your junk/spam boxes by mistake and you should ensure you have us "whitelisted" in your settings.
All orders are emailed to your registered email.
Please ensure your email is correct and that your order emails are not going to your junk/spam folders due to your mail settings.
Shop Manager > Orders then click "Mark Shipped" next to the order you have shipped.
This sends an automated email to the customer to let them know their order is on it's way.
You can see the customers email details by going to Shop Manager > Orders > View Details on the order you wish to obtain the contact details.
On Nordiina we do not have an internal messaging service.
At first, when an order payment is successfully done then seller will take further action and it will be changed to complete/shipped etc.
All orders set as processing for 14 days after the order was made.
Once this time has gone by we automatically mark the order as completed.
Payments taken between 3-7 working days to arrive in your bank account.
For the exact payout date please log into your Stripe account.
All orders should be dispatched as soon as they have been received.
Have more questions? Submit a request
For customer there is an option to request refund. when the refund is requested by the customer, the seller need to make sure they send us Some informations.
If you have received an order confirmation email but it is not showing within your Shop Manager, then please check the date range you have set in your Shop Manager and ensure the end date includes todays date.
If a customer orders from multiple sellers, you will see all the products they have ordered.
Please use the "view order details" or the order confirmation email to understand which products they have ordered from your shop.
Coupon codes allow you to create a discount code for customers of either a percentage off your products of fixed price off of your products.
Please note: They do not discount the total basket and instead provide a discount against each product.
Shop Manager > Settings > Coupon
Have more questions? Submit a request
You can set the coupon code to be any code i.e. "Nordiina123" for example.
Please note: you cannot have the same coupon code as one another seller might have on their account. If you choose the same coupon code name it will ask you to change it.
This is just for your information to remind you of what the coupon does.
I.e. For family and friends, 25% off from social media for example.
You can choose either fixed discount or percentage discount that will apply to each product when the coupon code is used.
If it is a fixed discount and you want to make it £1 off your products when used simply enter 1 into the coupon amount.
For percentage discount and you want it to take off 10% then simply enter 10 into the coupon amount.
There is no need for the percentage "%" or currency "£" symbols.
Seller can define Free shipping rule, based on x order amount or anything and then this option will be showed to customer on checkout page if his order amount meet seller condition
Ticking this will mean the order or product being purchased will have "Free Shipping" if it is applied on top of the coupon code discount.
Please note: If you are creating a "Free Shipping" coupon (i.e. coupon that gives free shipping and no other discount) then you need to enter the discounted amount (Shipping amount) in the Coupon Amount and leave this unticked.
Setting this date on the coupon will stop it working from this date onwards.
This allows you to run coupon codes for periods of time.
These settings allow you to put restrictions on your coupon code.
The minimum spend setting means that customer must spend that amount before the coupon code can be applied.
The maximum spend sets a limit on the amount a customer can spend before using the coupon code, i.e. if they go above this amount they cannot use the coupon code.
This restricts a customer from using multiple coupon codes on their order at the one time.
Ticking exclude sale items prevents the coupon code being used against any items you have on a reduced price, i.e. sale.
There are three different usage limit settings on coupon codes.
Usage limit per coupon - limits how many times the coupon code can be used.
Usage limit to x items - limits how many products the coupon code can be used against at any time.
Usage limit per user - limits how many times a single customer can use the coupon code.
Please note: leaving these blank will allow unlimited usage.
When you add a coupon code the code needs to be different to what is used by others sellers.
So if you add a coupon code that is already in use you will need to alter it to be unique, i.e. change the coupon code name.
You can share your unique coupon code across your social media pages for customers to use against your shop.
If you want organic visitors to your shop to know about your coupon, simply go to Shop Manager > Settings > Store and tick enable vacation mode.
The Vacation Message will then appear and you can leave the coupon code in the message.
This will show the coupon code on all of your products and shop for customers to see.
Please note: Do not "Disable add to cart for my products" as this will put your shop in full vacation mode and customers will not be able to buy your products.
The search functions based on keywords and/or phrases in product titles and their descriptions.
If you are selling a product, such as leggings, which would make a great gift for women or athletes you would have the type keywords such as "leggings, sports clothes, athlete trousers, training gear, sports pants" and so on in the title.
In the description you might write something like: "Make the most of your training with these sport leggings".
Please always include plurals of the type of product you are selling in your titles for example if you are selling a Jean: "Jean, Jeans".
Seller can see his/her shop statistics via login to his/her seller account and go to dashboard. Then click to Dashboard > Analytics
On this screen seller can check his/her whole year statics / Monthly / weekly stats / custom by choosing date range
- Seller can see their customer stats by most viewed customer country, top referrer, most viewed products, products stats and many more.
Click on Our Brands in footer, it will open page showing all sellers shop name. Then click on your shop that will open up the webpage of your shop url.
Seller have to communicate with admin and request to close shop account.
Your full account and details will be removed from our servers.
Before contacting us please ensure you have used our Help Centre to find the answer to your query.
We regularly update the Help Centre to ensure it is current and has all common queries answered.
If you cannot find an answer to what you are looking for then please submit a request to our support team using the link here.
We endeavor to answer all support queries within 1-3 working days.
—————– SHIPPING BY COUNTRY ——————
PLEASE NOTE: Shipping
3.The in shipping by country settings vendor can set the fields below.
These two fields do not affect the shipping costs.